Pretty, Shiny Things
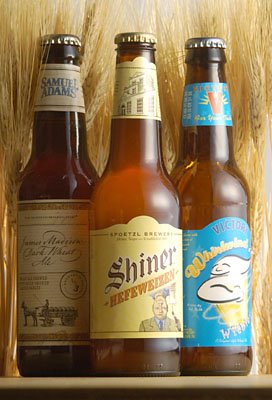
 I previously mentioned that I was in the studio the other day, shooting wheat beer. The light painting idea was a bust, and I had to bail to plan "B."
Even though I was using the bigger flashes for this job, I wanted to use this opportunity to show you a new lighting technique. You can also use this as a chance to exercise your "reverse engineering" skills.
The problem when shooting a dark, reflective object like a beer bottle is that it mercilessly throws all of your light right back at you. It's hard to hide from a curved reflector.
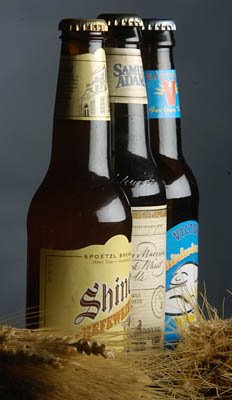
 In this early photo, which was a quick, CYA shot at the beginning of the session, you can see the problem. The softbox reflections are hot, and the rest of the bottle is pretty much without any useful detail.
To change the way a highlight is reflected back to you, you have exactly two options: You can change the surface quality of the subject, or you can change the appearance of the light source itself.
The former can be achieved with "matte spray," which I did not have. So I chose the latter.
Before I explain how I did it, stop right here and try to figure it out yourself for a moment.
--------------------------------
Now that you may or may not have it all figured out, I will tell you that I am using the same softbox as in the harder-light photo above.
The difference is that I am now double diffusing the softbox, which is actually a strip light. (No mystery there - it's what was available in the studio.)
In doing that, I am controlling the "specular-to-diffused transfer."
The what?
Yeah, I thought that might throw you. But no worries, you already know this. You just don't know the terms.
In any 3-d, lit object, there are three zones of light: The shadow, the diffused highlight and the specular highlight. There are also "transfer zones" between the various areas.
The shadow is the part that is not lit. On the earth, that'd be the side of the planet experiencing night time.
The diffused highlight would be the part receiving light from the sun - the daytime folks.
The specular highlight would be, say, the reflection of the sun you would see in a lake while flying in a plane.
The diffused highlight-to-shadow transfer zone would be the areas of the earth in twilight.
But there is also a specular highlight-to-diffused highlight transfer, which is what we are trying to control in the beer bottle. That'd be that sharp edge of the softbox reflection. And we want to soften that.
As I said before, matte spray would do the trick. It would change the surface quality of the bottle. But it'd also make the bottle look a little weird. So I prefer to alter the quality of the light.
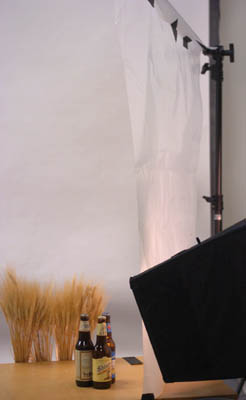
What I did was to place a sheet of Rosco Tough Frost (Made by the same folks who make the gels) in between the bottle and the softbox.
 It is kind of difficult to see, even with this scener shot, but what it does is to soften the edges of the softbox as seen from the beer bottle's perspective.
("Tough Frost" is pretty much what it sounds like it is. It is translucent, but not transparent. And if you are careful with it, it lasts through many, many studio shoots.)
This softening also shows up in the reflection was are trying to control. It is still a hard, glass reflection. But it is a hard reflection of a soft lighting transition. It is important to place the diffusion material very close to the subject, or you lose the effect.
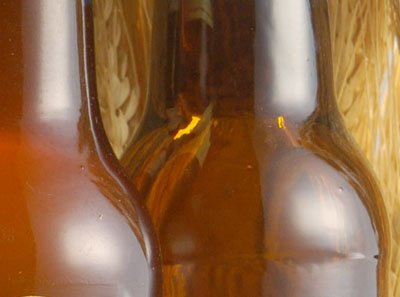
 Here is a detail from the final photo, with the target area seen in close-up. (Edit: Sorry about the confusion earlier.)
 Nothing has changed about the bottle. But the light is different, and I got the desired by altering the light.
I could have helped this along by getting the beers really cold in the fridge and letting them sweat a little in a warm studio, but I had no fridge nearby. This would have also visually suggested "cold," in addition to altering the reflective surface quality of the bottles.
You'd definitely want to do that in an ad shot.
This diffusion technique works great for shooting small, reflective objects. Instead off tough frost, you can use tracing paper or tissue paper, like we did in the macro studio. The point is to diffuse the light. Or to diffuse the edges of an already-diffused light source. You can completely redefine the (apparent) reflective quality of any surface this way.
I like to tape the back edge of a diffusion material down and support the front, like a little lighting lean-to. Then I put a light above it and shoot through the raised space in the front. Works great. I'll do an On Assignment shot like that soon.
For the record, this is all on a table and there is also another softbox behind the setup, backlighting the wheat stalks.
So, just some new techniques to think about.
Besides, you never know when you are going to be called upon to shoot a high-end shot of a beverage, anyway...
Next: Pool Portrait
__________
New to Strobist? Start here | Or jump right to Lighting 101
Got a question? Hit me on Twitter: @Strobist
Have a passport? Join me in Hanoi: X-Peditions Location Workshops
Permalink

<< Home